
Do you have way too many old clothes in your closet and don’t know what to do with old t-shirts? Then you are in the right place. Today we’ll be sharing with you creative and cool ways to cut a shirt, this way you won’t just throw away your old t-shirt, but you can also turn it into something entirely different. So check out DIY t-shirt cutting ideas no sewing.
We all have those baggy T-shirts we use only as pajamas, or there are ones you might have that are more fitted but the length is totally off, that you probably got from your crazy aunt as a Christmas gift. If you are anything like us, those pieces will most likely sit in your closet unworn. But did you know that you can fix this little predicament with your own hands?
It may sound quite intimidating to grab a pair of scissors and cut your t-shirt, but old t-shirts are great material to upcycle and turn into stylish and trendy brand-new clothing. And the best part is that there’s no sewing involved. Now you can come up with your very own collection of no-sew t-shirts with these DIY t-shirt cutting ideas.
DIY T-Shirt Cutting Ideas No Sew FAQ’s
How do you cut a shirt without sewing?
If sewing is a problem you can buy a roll of gluing material. Then you can fold and iron your shirt hem, make it nice and smooth, make sure the new hem is even. Maybe shoot for 1/2″ fold. Then cut the gluing material into the strips, the width should be a bit narrower than the fold, let’s say 3/8′ strips go well with 1/2″ fold. Tuck them in, and press with the iron. Make sure they are not sticking out otherwise the glue would melt to your iron. And there you go, no sewing.
How do you cut a t-shirt to make it look cute?
Cut a t-shirt into a cute and stylish top without any sewing involved. Choose different cutting techniques to revamp your old tees by changing the neckline, armhole opening, cropped length, and sleeve detail.
Convert your old tees into up-to-date clothes with these cool cutting tutorials. Each idea is guaranteed to make you excited to wear the old tee over and over again.
How do you distress a shirt with a razor?
You can drag the razor horizontally to create long slices in the tee similar to the scissors, pull it straight down (holding the fabric taut) for a variety of small holes, or place the fabric on a solid edge (like the corner of a book) for a line of straight holes.
How can you give a shirt a chocker effect?
You can do a V-neck cut. For this style, you’ll leave the trim on the collar and start making your cuts underneath so it gives that choker effect. You can always opt to make the cuts wider or deeper depending on how low, you want to go.
What’s an easy fix for any t-shirt?
The cropped cut. This is a classic and such an easy fix for pretty much any T-shirt you need to shorten, either by a little or a lot. You can make it as cropped as you want.
How can you create capped sleeves on a t-shirt?
Capped sleeves are easy to create with simple diagonal lines, and then you can get creative and start making cuts at the neckline, sides, and/or the bottom for an extra holey look.
What can you do if the sleeveless dip down too low on your t-shirt?
Imagine you did sleeves cut on your t-shirt, but now the sleeveless area dips down a little lower on each side, then you can perfectly wear a cute bralette underneath.
How can you turn a t-shirt into a strap tank top?
Create a new neckline and back opening to add a ¾” wide elastic strap to complete this tank top style. You can use between ¼”-1” wide elastic for this reconstruction tutorial.
Materials:
- Old T-Shirt
- ¾” Elastic Band
- Fabric Chalk
- Fabric Glue
- Measuring Tape
- Ruler
- Scissors
Directions:
- For this strap tank top from the t-shirt tutorial, lay the tee flat.
- To make the front of the strap tank top, measure 2½” from the high point on the shoulder and mark on the front neckband.
- Draw a smooth curved line that connects to the point on the side seam just underneath the armhole.
- Cut through the neckband and along the line to the underarm hole opening.
- Copy the new armhole onto the other side.
- To make the back cowl drape of the strap tank top, locate the center back between both under armhole openings. Measure 2” down from the halfway point.
- Draw a smooth curved line connecting the two points and cut to complete the back cowl drape.
- To make the tank top straps, cut two 20” long pieces of ¾” elastic band.
- Use fabric glue to connect one end of the elastic band to the top of the shoulder.
- Crisscross the straps. then attach the other end of the elastic band to the side seam below the under armhole opening to finish the no-sew strap tank top from a t-shirt.
What can you do with t-shirt cutting?
- Remove sleeves to create workout-friendly no-sew yoga tops from an old t-shirt to pair with your favorite leggings. From halter neckline to crisscross back detail, give a sporty style to an oversized tank top for a great layering piece with a sports bra underneath.
- Adjust the length to make a crop top from a t-shirt for a great design to wear with any high-waisted bottom.
- Cut and tie a shirt along the center back to create this modern-looking t-shirt into a back slit tank top.
DIY T-Shirt Cutting Ideas No Sew
There are at least five different ways in which you can make a shirt or t-shirt look totally different, without having to sew.
The V-Neck Cut
- Turn shirt inside out and lay on a flat surface. Make sure the front is facing up.
- Take a pen to mark the middle of the collar or eyeball it, and make a horizontal cut right underneath.
- Keep cutting until you get to your desired width and everything is symmetrical, then cut vertically down.
- Next, cut diagonally from the ends of the horizontal cuts to the bottom of the vertical line. If you did everything right, you should end up with a little triangle under your crew’s collar.
- Now, flip the shirt around again so you can see where it hits. Feel free to widen or deepen the hole to your preference.
- Stretch out the sides you cut so the fabric smooths out.
Hollow Out V Neck T-Shirt Women’s
This Funny Smooth as Tennessee Whiskey Tee is a perfect gift idea, made from a cotton blend, it is soft and comfortable.
The t-shirt features Smooth As Tennessee Whiskey Sweet As Strawberry Wine, also a sexy hollow-out deep V-neck and short sleeves.

Features:
- Hollow out deep V-neck
- Cotton blend
- Graphic tee
The Cropped Cut
- Lay the shirt on a flat surface and smooth it out completely.
- Measure out where you want the new hem to hit. I tried on this shirt beforehand, so I knew I wanted to cut it a couple of inches underneath the graphic.
- Take a measuring tape and use a pen to mark on each side so you know you’re cutting it straight.
- Start cutting on one side and make sure you’re in line with your other mark.
- Once cut off, stretch out the new hem with your fingers to give it a more worn-in effect.
- Optional: If your sleeves are bulky too, consider cutting off the trim on them as well to slightly shorten them.
Long Sleeve Crop Top T-Shirt
This top is so chic and cute, you can pair these ribbed knit tops with jeans and pants. Suitable for casual, shopping, date, hang out, home, office, work, school, daily wear, etc.
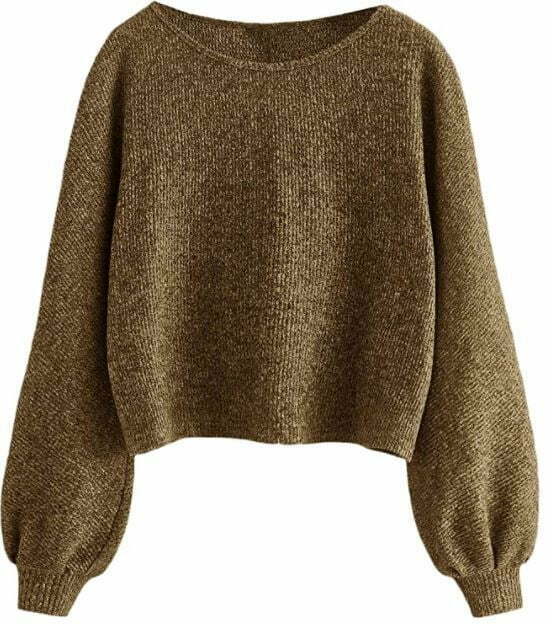
Features:
- Solid color
- Cropped
- Raglan sleeve
The One-Shoulder Cut
- Turn your shirt inside out with the front-facing up and lay on a flat surface.
- Pick one side, then start a vertical cut parallel to the collar through both the front and back fabric.
- Continue about two inches around the collar, then cut diagonally to the corner of the sleeve, forming a triangle.
- Flip the one shoulder over to the back, and there will be one uncut piece by the collar. Trim this part following the curve of your previous cut up to where the collar begins and then snip it off in a triangle shape.
- Stretch out the fabric so it looks more worn-in.
- Optional: Repeat these steps on the other side for a cold-shoulder look.
One Shoulder Long Sleeve Fitted T-Shirt
One-shoulder plain top, left strappy long sleeve, right shoulder sleeveless, ruched at the waist, asymmetric neckline, solid bodycon tee, casual fitted t-shirt.
Suitable for club, work, school, casual, street, daily, formal, home.

Features:
- Pull-On closure
- Plain
- Asymmetric
The Sleeveless Cut
- Lay the shirt on a flat surface and smooth it out completely.
- Cut across where you want the new hem to hit.
- Then taking one sleeve, cut horizontally and stop at the shoulder seam.
- Following the same seam but still leaving it on, cut down until you hit the armpit. Flip the sleeve over and continue cutting parallel along the seam until the entire sleeve comes off.
- Repeat on the other side.
- Stretch out any areas you cut to smooth out the edges.
Women’s Sleeveless Loose Tank Top

Make of lightweight, breathable and stretchy fabric for a relaxed feel.
Features:
- Sleeveless
- Scoop neck
- Cut out open back
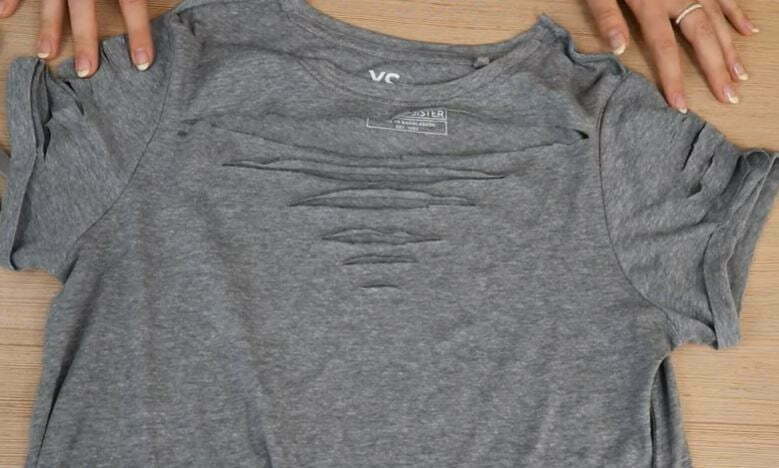
The Overall Distressed Cut With Cap Sleeves
- Lay shirt on a flat surface.
- By the armpit of one sleeve, use your scissors to cut a diagonal line to the right, going through both the front and back of the fabric.
- Once the piece comes off, line it up with the sleeve on the other side, so you can make sure they’ll be pretty symmetrical. Follow the pattern with your scissors to cap the other sleeve.
- To make the generally distressed areas, cut lines; they can be any length, wherever you want these details to appear. After cutting, stretch them out with your fingers to widen them, and don’t be afraid to really pull.